A Solution to Limited Search

Written by Vasken Hauri, Vice President, Platforms & Systems at ElasticPress.io, one of our sponsors.

WordCamps are a great way to see the strength of the WordPress community up close. At WordCamp Seattle, you can connect with hundreds of WordPress developers, designers, and publishers. ElasticPress.io is proud to support the WordPress community as a sponsor of another WordCamp Seattle. There’s an indelible link between an open, collaborative internet, the strength of the tools and platforms that drive experiences on the web, and the community that builds it all. WordCamps provide an integral opportunity to grow and educate that community, which is why 10up—the company behind ElasticPress—has been sponsoring WordCamps since our founding back in 2011.

ElasticPress.io is 10up’s solution to the limited search features and other query bottlenecks endemic to WordPress core, especially when used at scale.

MySQL

You see, out of the box, WordPress uses MySQL to organize and store content—a popular database making WordPress accessible to developers, and making it possible for small sites to access cheap hosting. However, databases like MySQL aren’t optimized for freeform search and more complicated filtering and faceting. So much so that, by default, WordPress search only looks at post titles and content, omitting valuable data that might be stored in places like custom fields. Multifaceted queries—say, looking for (1) women’s (2) t-shirts in size (3) medium that are (4) in stock and (5) less than $30 are slow and taxing on hosts, and, with so many combinations, cannot easily be circumvented with conventional techniques like caching. This limits the options for large-scale databases or sites running in a shared hosting environment.

Some plugins work around some of these challenges in inspired ways, but most are restricted to mitigating unavoidable MySQL limits. The more your content grows—whether you’re a newsroom with thousands of stories or a store with hundreds of SKUs—and the more ways to filter that content, the more unavoidable the problem becomes. Plugins, like SearchWP and Relevanssi, do a good job of addressing the weaknesses inherent in default WordPress search, but we believe these best serve sites with smaller databases, or perhaps up to a few thousand posts. Larger sites will require a different solution.

Elasticsearch

This challenge, plaguing a rapidly scaling internet, spawned a new generation of “noSQL” content storage and search solutions—one of the most popular being Elasticsearch. Elasticsearch is an open-source, third-party service that can filter between different types of content, categories, tags, authors, date ranges, etc. It must be run on hosting accounts through a dedicated hosting environment. Further, it requires extensive configuration. With no structure inherent to itself, the setup of Elasticsearch requires the input of all data components, field types, languages, or any other custom elements your schema requires. This makes it a great option for sites supported by experienced development teams.

Seeing the need for a full-featured search solution for large-scale sites, and determined to help them keep pace and not “outgrow” WordPress, 10up created and open sourced ElasticPress, a plugin that acts as “smart glue” between Elasticsearch and your WordPress data.

The plugin requires Elasticsearch to be properly installed and configured, so ElasticPress.io, the complete, end-to-end search and query engine for WordPress.we felt there was still more we could do to support sites that may not have the technical staff or time to configure and maintain Elasticsearch. Technologies are also evolving rapidly—Elasticsearch is iterating and we’ve also been adding features and tuning search logic for the ElasticPress plugin. But some features require greater control of the server for adding modules and ensuring the security of all applications.

The complete, end-to-end search and query engine

So we created ElasticPress.io, the complete, end-to-end search and query engine for WordPress. Extending Elasticsearch technology, ElasticPress.io works with our ElasticPress plugin to seamlessly connect WordPress to a modern, high-performance solution enabling features like:

  • Weighted full-text search, including custom fields, tags, and other metadata;
  • Fuzzy matching with spelling suggestions;
  • Full-text search of popular documents formats like PDFs and Word documents;
  • Autocomplete recommended matches in the search bar (“autosuggest”);
  • Searching across all sites in a multisite;
  • Drag-and-drop “facet” widgets for high-speed filtering of content across multiple categories or taxonomies;
  • WooCommerce optimization, speeding up search results and product filtering so that customers can quickly and dependably find and buy the products they’re looking for.

Built to be extended.

Designed and engineered by our team at 10up, the ElasticPress plugin is built to be extended. WordPress developers can take advantage of its APIs, hooks, and other developer features to customize its default behavior and further tap into its potential for each project.

The ElasticPress plugin will always be free and open, and we plan to make every feature we can available for any Elasticsearch host, for teams who are up for tuning and managing their own hosting. For everyone else, our end-to-end ElasticPress.io solution starts at $79/month, and you can try it out for free for 14 days. Combined with our customer support, for most businesses and developers, we think this makes the benefits of ElasticPress and modern query engines accessible to a whole new part of the WordPress community.

Stop by our table and learn more about ElasticPress.io, or to chat WordPress development and open source. You can also follow along with us on Twitter, at @ElasticPressIO. We can’t wait to see you at WordCamp Seattle.


Don’t Break Your Live Site

Leveraging Staging Environments for Happier Customers

Written by Dwayne McDaniel, Developer Advocate at Pantheon, one of our sponsors.

Leveraging Staging Environments for Happier Customers

The best way to make sure that your users stay safe and your work remains secure is to update your WordPress site. The WordPress Security team works hard to ensure that new risks get addressed as soon as they arise. They provide their security fixes through the update system. Plugin and theme authors do the same. Applying new updates as they appear is, without a doubt, the best way to make sure your site stays safe.

But some updates can also introduce changes in how the software behaves. This happened in a core update as recently as the 4.2.3 release. That update changed how the Shortcode API functioned.  This resulted in a lot of support calls and a lot of hours of work for sites that had simple auto-updated.

Soon, a major update will once again change the default behavior of the world’s leading CMS. With WordPress 5.0, Gutenberg becomes part of core. This means the default editing experience is set to change. If your users not aware of this coming change, this might result in a busy day of support calls and extra work. How can we best prepare ourselves and our clients for the changes that an update might bring?

Enter the Staging Environment

When you update your site, don’t just do it on the live, production server.  Instead, first apply those updates in an identical, separate environment. This environment can have different names. Integration, Testing, Pre-production, or the most common, a Staging Environment.

Your Staging Environment should be as identical as the production environment as possible. In the best of worlds you will be able to make a fresh clone of your live production site before making any changes. This might be as simple as setting up a local development environment with the exact technology stack you are using for your live site. Most hosting providers will provide these Staging Environments as well. The leading managed hosting providers include these environments by default.

Update and Test Away

Once we have our Staging Environments, we can apply all available updates without fear of disruption on the production website. If all goes as expected, we won’t actually see anything break. Then we can push those same changes to our live environment without fear. If things break, then we have a chance to find a remedy before we apply updates to production. The only way to know if it did go as expected is to test.

Most simple testing can is manual. Looking at the home page and  a few other key pages.  Testing out forms and other functions might only take a few minutes. But as sites grow in size and complexity, manual testing becomes a time consuming feat. If we are being honest, manual testing every page and possible feature is monotonous and boring. It can become a neglected step.

The great news here is that there are many ways to automate the testing process. For visual testing, open source tools like BackstopJS or paid services like Percy or StagingPilot can automate testing every page and every <div>. For functional testing, we can look to tools that have arisen from Behaviour Driven Design, like Behat and it’s WordPress extension WordHat. We can also test out how these updates might affect performance, accessibility and SEO through use of Google’s Lighthouse, which comes with Chrome browser for free.

The Secret Is in the Separate Environment

The testing tools mentioned here are just a few examples of tools you can use to make your life easier as you make sure your sites are up to date.  The key to all of them though, is the ability to make and test changes safely away from your website’s live environment.

There are a number of awesome presentations at WordCamp Seattle this year that directly speak to the advantages of multiple environments and the power of automated testing. There are also a lot of WordPress professionals who will be glad to share their thoughts on these best practices and what tools they use. I am looking forward to the conversations.

Adding Voice and Text Capabilities to WordPress

by Peter B. MacIntyre, ZCE  

DISCLAIMER: We have not tested this code.

Recently I came across RingCentral (one of our sponsors), and their way cool suite of communications products.  With RingCentral, companies are able to take their traditional phone system into the cloud (letting them have multiple numbers ring, make calls from their office phone, laptop, or cell phone, and letting them configure their phone system through an online interface).

But beyond the traditional phone system, RingCentral also provides numerous APIs and widgets via the Developer program – letting their customers make phone calls, send text messages, build out team messaging and interactions, schedule meetings, and even send faxes (if that’s still a thing) all online programmatically.

Seeing all of these capabilities made me start to wonder, what could I as a WordPress developer do with them?  And how could these features help my customers?Naturally, that meant it was time to build a WordPress plugin.  Specifically one that would let users subscribe to be notified via text message when new blogs were posted, but also that would let administrators make phone calls and send SMS messages from within the WordPress admin.

Jumping into the Code

To get started, I created a basic WordPress plugin skeleton. Create a folder under the wp-content/plugins folder structure and call it the same name as your plugin “/ringcentral” in our case. Then have a PHP file named the same as the folder within that folder: “ringcentral.php” in our case. Also, in that folder you should have a file called “uninstall.php” that will be used if the plugin is to be removed at any time. This will have any commands in it that will allow the plugin to remove itself from the WordPress environment and also tidy up after itself in the database if that is required. The overall folder structure should look like this including folders for all the supporting cast of characters (technology) that you may use over time. The “includes” folder is where you would place the majority of your plugin’s PHP code.

Within that “ringcentral.php” PHP file you should have the basic comment header that describes the plugin and any licensing that goes along with it, typically the GPL2 license is used. Here is a generic example that would be in this path    wp-content/plugins/my-own-plugin/my-own-plugin.php:

/*

Plugin Name: My Own Plugin

Plugin URI: http://paladin-bs.com/mage/

Description: My Own Plugin Admin System

Author: Peter MacIntyre

Version: 0.25

Author URI:  http://paladin-bs.com/peter-macintyre/

Details URI: http://paladin-bs.com

License:     GPL2

License URI: https://www.gnu.org/licenses/gpl-2.0.html

My Own Plugin is free software: you can redistribute it and/or modify

it under the terms of the GNU General Public License as published by

the Free Software Foundation, either version 2 of the License, or

any later version.

My Own Plugin is distributed in the hope that it will be useful,

but WITHOUT ANY WARRANTY; without even the implied warranty of

MERCHANTABILITY or FITNESS FOR A PARTICULAR PURPOSE. See the

GNU General Public License for more details.

See License URI for full details.

*/

After this typical heading, you would start your code. Keeping in mind that usually you are creating a plugin with an admin menu component, you would add in a basic menu structure with code like this:

/* ===================== */

/* Make top level menu            */

/* ===================== */

function My_Own_Plugin(){

   add_menu_page(

       ‘My_Own_Plugin Admin Management Page’,  // Page & tab title

       ‘My Own Plugin’,                        // Menu title

       ‘manage_options’,                      // Capability option

       ‘MOP_Admin’,                            // Menu slug

       ‘MOP_config_page’,                  // menu destination function call

       ‘dashicons-admin-multisite’,            

// use a dashicon available in WordPress

                      // https://developer.wordpress.org/resource/dashicons

               // plugin_dir_url(__FILE__) . ‘images/My_Own_Plugin_icon.jpg’,
                        // or add your own custom menu icon

       80 );                                // menu position level


   add_submenu_page(

       ‘MOP_Admin’,                               // parent slug

       ‘My_Own_Plugin System Configuration Page’, // page title

       ‘System Config’,                           // menu title – can be different than parent

       ‘manage_options’,                          // options

       ‘MOP_Admin’ );                             // menu slug to match top level (go to the same link)


   add_submenu_page(

       ‘MOP_Admin’,               // parent menu slug

       ‘Do Something Cool Page’,  // page title

       ‘Do Something Cool’,       // menu title

       ‘manage_options’,          // capability

       ‘DSC_upl’,                 // menu slug

       ‘DSC_html’                 // callable function

       );

Then calling the add_action hook to run the My_Own_Plugin menu building function, and sub-menu functions.

add_action(‘admin_menu’, ‘My_Own_Plugin’);  // call add action func on menu building function above

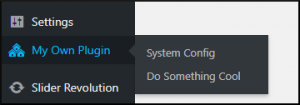
Done right this will create a new plugin entry on the inactive tab of the admin plugin section. Activate the plugin and you should see a new menu item structure that should look like this.


Adding the Virtual Phone

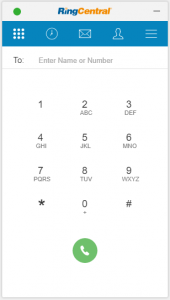
One of the nicer elements of RingCentral Developers is that they offer a copy and paste widget.  This meant that I could add the virtual phone to the admin with the following HTML snippet:

<script src= “https://ringcentral.github.io/ringcentral-embeddable-voice/adapter.js”></script>

However, I wanted to go a little bit further, giving the administrator the ability to not only use the API to send SMS messages, but also be able to turn different features of my plugin on or off.  

To do this, I built a basic page for the WordPress admin area and jazzed it up with a logo or two. I added a checkbox to turn on or off the embedded phone tool and kept that value in a database table I created.


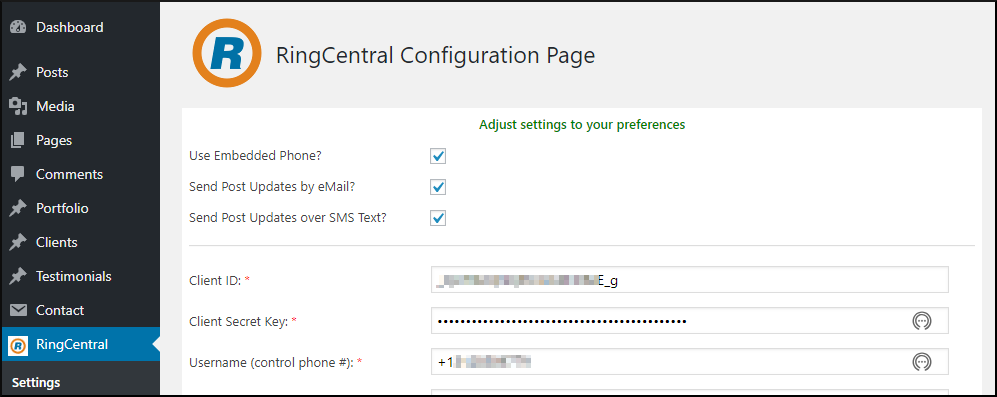
A quick tangent: be sure to write your SQL code with security and stability in mind. By this I mean that you should be using SQL prepared statements as one means of defense, it will save you a lot of headaches. Also on the stability point, when creating a plugin that will change and improve over time be sure to write your SQL table alterations (in an activation subroutine) with the dbDelta WordPress function; you’ll be glad that you did.

Next I wrote a simple “admin_footer” action in the plugin that would call a function to interrogate the DB value and show or hide the phone app accordingly.

/* ============================================= */

/* Add action for the ringcentral Embedded Phone app toggle   */

/* ============================================= */

add_action(‘admin_footer’, ‘ringcentral_embed_phone’);

/* ====================================== */

/* Add custom footer action                                          */

/* This toggles the ringcentral Embedded Phone app  */

/* ======================================= */

function ringcentral_embed_phone() {

   global $wpdb;    

   $result_rc = $wpdb->get_row( $wpdb->prepare(“SELECT `embedded_phone`

       FROM `ringcentral_control`

       WHERE `ringcentral_control_id` = %d”, 1)

   );  

   if ($result_rc->embedded_phone == 1) { ?>

    https://ringcentral.github.io/ringcentral-embeddable-voice/adapter.js

   <?php }

}

The neat thing about the “admin_footer” action call is that it inserts my defined function call in every page of the admin interface thus allowing the phone app to be accessible anywhere within the WordPress admin area.

And just like that I now had my virtual phone in WordPress!


Adding in SMS Notifications

While the virtual phone let me manually send SMS messages and make phone calls from the admin, I wanted to let my readers (and my customer’s readers) get SMS notifications about new blog posts automatically.

To do this, I built a widget interface asking site visitors if they want to sign up for news feed notifications (blog announcements) when new posts are published on the website.


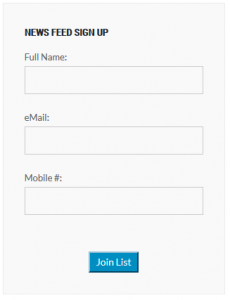
When a user signed up, they would then be added to the database, and receive an email notification asking them to confirm their email address, an SMS notification asking them to confirm their phone number, or both.

To send an email notification, I simply used the pre-existing wp_mail function, but to send SMS messages I would need to call the RingCentral API.

Adding in the RingCentral API

Thankfully, RingCentral provides a full PHP SDK that lets you take advantage of all their API calls, without having to understand cURL, adding attachments (for MMS or fax), or boundaries (don’t even ask).  You can get the RingCentral SDK using Composer by running the following command:

php composer.phar require ringcentral/ringcentral-php

And then including the RingCentral SDK with the vendor autoload file:

require(‘vendor/autoload.php’);

Now calling the RingCentral PHP SDK class is as simple as:

$sdk = ringcentral_sdk() ;

Sending the Text Message

Now was the time for the moment of truth.  I built a function using RingCentral’s SDK to send text messages, wrapping it in a try/catch, like so:

try {

       $apiResponse = $sdk->platform()->post(‘/account/~/extension/~/sms’,

           array(‘from’ => array(‘phoneNumber’ => ‘$config[‘ringcentral_number’]’),

               ‘to’ => array( array(‘phoneNumber’ => $mobile_contact[‘mobile’]) ),

               ‘text’ => $message ) );

   } catch (\RingCentral\SDK\Http\ApiException $e) {        

       $apiResponse = $e->apiResponse();

       $return_message = “There was an error broadcasting to the mobile list. => ” . $apiResponse;

   }

In the case of this function, I would pass in $sdk and $config as globals, and pass the $mobile_contact and $message as parameters, letting me reuse the function for each subscriber within a loop.

And needless to say – it worked!  Well sort of… my friends in the US and Canada received the text without any problem.  But it turns out, to protect users RingCentral requires you to enable international SMS messages for the API (as domestic text messages are free, but international texts usually cost more due to carrier fees).  This means to use RingCentral SMS internationally, you’ll need to enable this on your RingCentral account (and also be very conscious of how many international messages you’re sending).

One solution I came up with was to limit the SMS subscriptions to North American numbers only, while letting everyone receive email notifications.  This was as simple as implementing a quick regex to validate the phone number and the country code.

if (!preg_match(‘/1[0-9]{9}/’) {

   echo ‘Only US Numbers are supported at this time.’;

}

Next Steps

With RingCentral’s platform, the sky’s the limit – as you have the ability to not only create SMS notifications, but start video meetings and build in real-time, rich messaging that can be accessed from within your app, via the RingCentral App, and on the go.

The same goes for this plugin.  While it now supports the virtual phone widget and SMS notifications, I’m excited to see what else we can add to it, and how we can take advantage of real-time communication tools inside of WordPress.

If you happen to be at either WordCamp Seattle, or RingCentral’s ConnectCentral conference in San Francisco I’d love to talk to you more about how I built the plugin, it’s current status, and what the future holds.  And, of course, if you’re looking for a WordPress developer – Paladin is open for business!

You can also get more information about this plugin, including when it is officially released at https://paladin-bs.com/contact/ (please use “RC API Plugin” as the subject).


=====================

Peter MacIntyre has over 28 years of experience in IT, primarily in PHP. Author of “Building Exceptional Sites with WordPress & Thesis” and “PHP: The Good Parts“; co-author: Programming PHP-3rd Ed & Pro PHP Programming, among others. Peter has spoken at PHP Central Europe (Warsaw, Poland); PHP[World] 2016 (Washington, DC); ZendCon 2016 (Las Vegas), NortheastPHP (Boston), CA-World (New Orleans); CA-TechniCon (Köln, Germany); and CA-Expo (Melbourne, Australia).  Peter is a past co-chair and co-founder for the Northeast PHP Developer’s Conference, and is Zend certified for both PHP 5.3 and 4.0.

7 Tips to Kickstart Your New Website

7 Tips to Kickstart Your New Website by SiteGround

Written by the team at SiteGround, one of our sponsors.

The fall season is a great time to start with the projects you’ve been putting off until now. Whether it’s a freelance career or a business idea, one thing is sure – you will need an attractive and functional website to help you share it with the rest of the world. To help you out, we’ve made a list of 7 important assets and tools that will let you start, protect, and manage your new website.

Domain name registration

The first important step is having your own domain name, instead of a free service subdomain. It not only makes it easy for your company to be found online, but it also brings credibility to visitors and potential clients.

Since .com domain names are almost always taken, you can use this chance to play around with your domain extension and get anything from .bike to .coffee, for example.

Email accounts connected to your domain name

Another absolute must is having an email account that matches your domain name. A custom, branded email address will make you look professional. It also helps those receiving an email from you find out your website, so look for a web hosting company that provides you with that key option.

Apart from the administrative features like domains and emails, it’s good to be forward-thinking and take some website security measures on time. There are many things that go behind making your website and connection secure and some of these processes might be complex and time-consuming.

Luckily, managed web hosting can help you a lot in that direction. Managed hosts handle all complicated technical aspects of hosting like software installations and updates, server security, optimization and many other things which you should take care of if you’re running a server yourself.

SSL certificate

The bare minimum for any website security is the SSL technology that 

Kickstart Your New Website by SiteGround

protects the data which goes from your website to the server. To take advantage of it, you need to install an SSL certificate that will encrypt and protect sensitive data like credit card numbers, personal information, data transfer, logins and similar.

When you have an SSL certificate, a padlock icon will appear next to your website URL in the browser, indicating that your connection is secure and that you have a valid SSL certificate. Some managed web hosting providers have made installing them super easy and quick. So don’t miss to take advantage of this great technology.

Auto-updates and backups

Updating your WordPress and plugins regularly is critical for website security as well, but it can be a tedious task. The same goes for backing up your website, files, databases, and emails. The smartest thing you could do is using automated tools that can update and back up your website when needed. That way you have peace of mind that if something happens to your data, you will always have a recent backup to restore.

CDN and caching

CDN (Content Delivery Network) and caching are widely-used technologies and a must if you have visitors from different countries and you want to improve your site speed. The CDN will distribute copies of your website to different servers and when a user requests to visit your site, it will be loaded from the closest server geographically. This will dramatically improve your site speed.

Caching, on the other hand, will keep the static content of your website in a temporary storage area, thus improving your website performance. With a good caching solution, your website will be as fast as a static page.

There are many free and paid solutions you can choose from. If you’re not sure, your managed hosting provider will be best suited to advise you how to easily enable caching for your site.

When working on your website, have these technologies in mind and select or switch to a reliable hosting provider that can help you easily implement them, so you can focus on what’s more important – developing your content and ideas.

Six Steps to Secure Your WordPress Sites

Plesk WordPress website security

Written by the team at Plesk, one of our sponsors. 

Hackers seem to be targeting WordPress sites more and more. We always hear about the ease and speed of setting up WordPress sites, but what about WordPress security? Don’t risk your company and customers’ info and follow these steps for the best security practices.

1. Update files and plugins regularly

Any vulnerability is a risk, so we wouldn’t take any chances if we were you. There are new WordPress security patches and plugins released all the time to fight the latest threats. So being equipped with the most recent version enhances your WordPress site’s security.

2. Limit access to WordPress admin panel

Here’s where you access and perform all your site actions. Well, you and everyone who has access. So, it’s important to restrict /wp-login/ or /wp-admin/ access to those who really need it.

3. Manage your locations

Take your home IP and add text lines to the /.htaccess/ file you’ll find in your WordPress admin panel. Replace the current location with your home IP address, like this:

  1. <Files wp-login.php>
  2. order deny, allow
  3. Deny from all
  4. Allow from xx.xxx.xxx.xxx
  5. </Files>

Multiple locations

If you want to allow logins from multiple locations, add another “Allow from” statement in the text line to insert more addresses.

Do you switch locations and use Wi-Fi?

Then you need access to your admin panel regardless of IP address. So security, in this case, will come from limiting login attempts to a small number. Meaning you’re safe from those trying to guess your password.

Start by adding the “WP Limit login attempts” plugin. Then choose the number of wrong password entries before one gets locked out. This makes you less vulnerable.

4. Change the admin username

You may think this is obvious, but you’d be surprised to know many users never change the WordPress username. Keeping the default username gives hackers a window to login as “admin” because all they need is a bot to try and guess the password repeatedly. And even worse, they’re often successful. So best avoid all that and change your username right away.

5. Make your passwords harder

No matter how unique you think your password is, the fact is – many will have the same or similar. Think about it this way, you don’t think too much about what goes into your password, but a hacker, whose mission it is to break through your barriers? They will!


Here’s how you do it. Think of a sentence that’s characteristic to you and use the first letter of each word. Mix in some numbers and symbols intermittently to add to the complexity – and voila!

6. Wipe out viruses and malware

You probably know that the biggest threats aren’t actually direct attacks but an intelligent malware or virus that sits on your computer for ages, collecting important info.

This is how a hacker quickly acquires your login details when you access your site. Hence why you need a good antivirus installed. Just make sure you update it and scan your computer as often as possible for optimal security.

But can you be 100% secure?

There’s no such thing online. However, follow these necessary steps and you’ll get significantly fewer chances of hacking, data theft, and misuse. Going one step further, tools like Plesk WordPress Toolkit let you perform security checks on content, databases, files, directories, installations and more. You can have this if you install Plesk panel on your system.

New sales tax rules for remote sellers: Is economic nexus on your radar?

Is economic nexus on your radar

Is economic nexus on your radar?

by: Gail Cole, Writer for Avalara, one of our sponsors 

The Supreme Court of the United States recently upended the world of sales tax with its decision in South Dakota v. Wayfair, Inc. (June 21, 2018). Since then, one state after another has adapted its sales tax laws to the post-Wayfair reality. What does this mean for businesses?

It means there’s a whole new way for states to legally impose their sales tax laws on more sellers.

The old way: Tax linked to physical presence

Prior to Wayfair, sales tax was linked to physical presence: A state could require a business to collect and remit sales tax only if it had a physical presence in the state.

The new way: Economic nexus

In South Dakota v. Wayfair, Inc., the Supreme Court found the physical presence rule to be “unsound and incorrect” and overruled it. The case grew out of a challenge to South Dakota’s economic nexus law.

Economic nexus bases sales tax obligations on economic activity in a state rather than physical presence alone. Under South Dakota’s law, a remote seller must collect and remit sales tax if it had more than $100,000 in South Dakota sales, or 200 or more transactions delivered into the state in the current or preceding calendar year. South Dakota will start enforcing economic nexus on November 1, 2018.

Eager to reap the rewards of this ruling, other states are embracing economic nexus. As of this writing, 27 have done so, and several more have indicated that they intend to, including Kansas, Nevada, and Texas. Economic nexus is already in effect in several states, and it’s taking effect in nearly a dozen more on October 1, 2018.

Impact on businesses

Economic nexus has a real, immediate impact on businesses, many of which are struggling to understand and address new requirements that have emerged in the wake of the Wayfair decision. Anyone making sales, off-line or online, to customers in a state with economic nexus could be on the hook for sales tax.

Here are three steps to take to survive in the post-Wayfair world:

1.     Know your nexus

Figure out where you have nexus now, and where it’s looming. This is a moving target because sales tax laws are subject to change in every state, and your responsibilities under those laws can change as your business grows. You can’t just look into this now and then forget about it.

Determining nexus is complicated by the fact that there’s little uniformity between state sales tax laws. While there are certain truisms (e.g., a physical presence in a state still triggers nexus), there are many differences — even physical presence can be defined differently among the states.

This is particularly true with respect to economic nexus. For example: Illinois includes exempt transactions in its economic nexus threshold, but not digital property; Kentucky includes digital property delivered electronically but not services; Hawaii includes tangible personal property, intangible property, and services. The threshold for many states is $100,000 in sales or 200 transactions, but in Alabama it is $250,000, and in Connecticut, it’s $250,000 and 200 or more retail sales.

Businesses currently not meeting the thresholds in economic nexus states need to be vigilant. It’s important to monitor sales in those states so that if economic nexus is triggered, you catch it right away.

2.     Register

Once you’ve determined you have nexus, you need to register with the tax authorities and commence collecting, remitting, and filing sales and use tax. Failure to do so could trigger penalties and interest.

Not surprisingly, filing requirements vary from state to state. Keeping on top of your obligations with the additional burden of economic nexus is challenging, especially for businesses relying on in-house staff. Allowing a third-party to take care of sales tax registrations can bring peace of mind.

3.     Simplify compliance

Economic nexus is likely to trigger a tax collection obligation for businesses of all sizes in many states. And keeping track of sales tax in multiple states — determining where you have nexus, registering, calculating tax, handling exemptions, monitoring rates, rules, and regulations, filing, and so forth — can be a full-time job.

Fortunately, there’s a government program that may help in some states. Streamlined Sales Tax (SST) will cover the cost of an automated sales tax solution for qualified businesses in any or all of the 24 SST member states, 16 of which have adopted economic nexus.

Welcome to WordCamp Seattle

We’re happy to announce that WordCamp Seattle is officially on the calendar!

WordCamp Seattle will be November 10-11, 2018 at the Washington State Convention Center.

Subscribe using the form in the sidebar to stay up to date on the most recent news. We’ll be keeping you posted on all the details over the coming months, including speaker submissions, ticket sales and more!

WordCamp Seattle 2018 is over. Check out the next edition!